Organizing your email efficiently is essential for better productivity and email management. One of the best ways to keep your inbox clutter-free is by creating folders for specific emails. If you're a Mac user, knowing how to create new folders in Mac Mail can help streamline your workflow and keep emails categorized effectively. This guide will walk you through the process of creating folders, managing them, and ensuring your email stays organized.
Why You Should Use Folders in Mac Mail
Using folders in Mac Mail allows you to:
- Keep emails sorted by categories such as work, personal, or promotions.
- Quickly access important emails without sifting through a cluttered inbox.
- Improve productivity by prioritizing emails based on urgency.
- Reduce stress by maintaining a clean and organized mailbox.
Steps to Create New Folders in Mac Mail
Creating new folders in Mac Mail is a simple process. Follow these steps to set up and organize your email:
1. Open Mac Mail
- Launch the Mail app on your Mac.
- Ensure that your email account is properly configured.
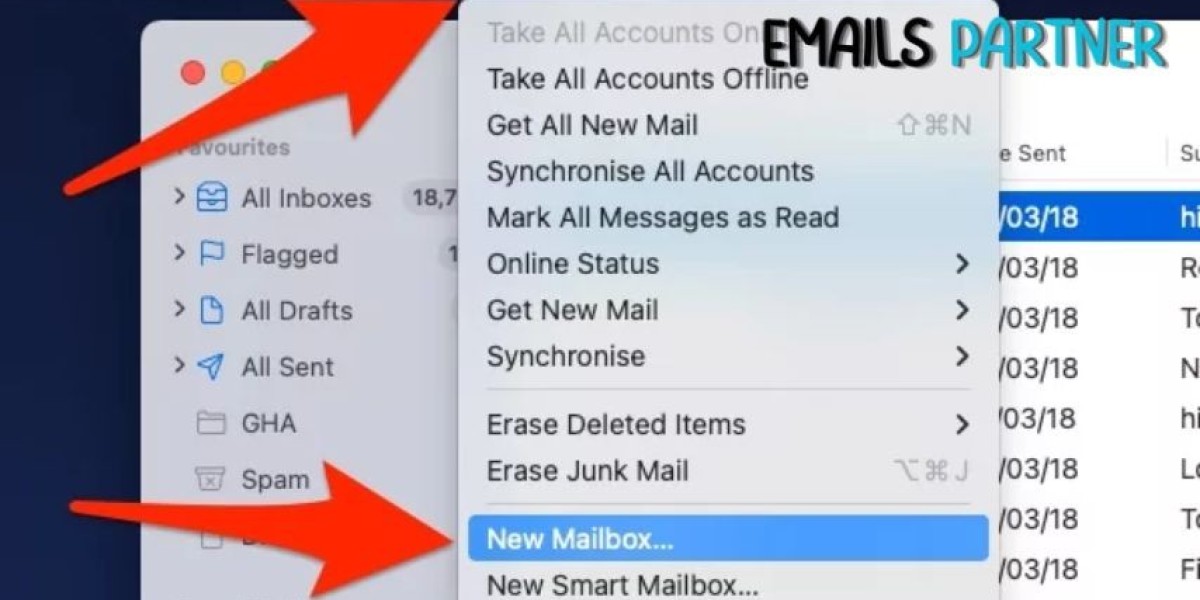
2. Access the Mailbox Menu
- On the top menu bar, click on Mailbox.
- Select New Mailbox from the dropdown menu.
3. Choose a Location
- A pop-up window will appear asking you to select a location.
- Under Location, choose the email account where you want the folder to be created.
- If you want the folder to be available across devices, select iCloud.
4. Name the Folder
- Enter a descriptive name for the folder, such as "Work Projects" or "Personal Receipts".
- Click OK to finalize the folder creation.
5. Move Emails to the New Folder
- Drag and drop emails from your inbox into the newly created folder.
- You can also right-click on an email, select Move to, and choose the appropriate folder.
Managing and Organizing Folders in Mac Mail
Once you've created folders, it's important to manage them effectively:
1. Renaming a Folder
- Right-click on the folder in the sidebar.
- Select Rename Mailbox and enter the new name.
2. Deleting a Folder
- Right-click on the folder and select Delete Mailbox.
- Confirm the deletion when prompted. Be cautious as deleted folders cannot be recovered easily.
3. Creating Subfolders
- To create subfolders, follow the same steps but choose an existing folder as the location.
- This is useful for further categorization, such as "Work > Reports" or "Personal > Travel".
4. Sorting Emails Automatically
- Use Rules in Mac Mail to automatically sort incoming emails into specific folders.
- Go to Mail > Preferences > Rules and set conditions for automatic email sorting.
Troubleshooting Issues When Creating Folders
While creating folders is straightforward, some users might face issues. Here are solutions to common problems:
1. Folder Not Appearing
- Restart the Mail app and check if the folder appears.
- Ensure that your email account is properly synced.
- If using iCloud, verify that iCloud Mail is enabled in System Preferences.
2. Unable to Create a Folder in a Specific Email Account
- Some email providers, such as Gmail, have limitations on folder creation.
- Ensure IMAP is enabled in your email provider's settings.
- Try creating the folder via the web version of your email service and then syncing it with Mac Mail.
3. Emails Not Moving to Folders
- Check if the folder has been created under the correct email account.
- Verify that the email is not locked or flagged.
- Restart the Mail app and try moving the email again.
Additional Tips for Email Organization
To maximize efficiency with folders in Mac Mail, consider these tips:
1. Use Smart Mailboxes
- Smart Mailboxes allow you to filter emails based on criteria such as sender, subject, or date.
- Go to Mailbox > New Smart Mailbox and define the criteria for email filtering.
2. Archive Emails Regularly
- Instead of deleting emails, use the Archive feature to store less frequently accessed emails.
- This keeps your inbox clean without losing important information.
3. Color-Code Folders
- While Mac Mail does not have a built-in folder color-coding feature, you can use emojis or special characters in folder names to make them stand out (e.g., ? Work, ? Clients).
4. Use Flags and VIPs
- Mark important emails with Flags to prioritize them.
- Assign VIP status to key contacts so their emails are automatically highlighted.
Conclusion
Creating and organizing folders in Mac Mail is a powerful way to improve email management. By following these steps, you can ensure that your emails are categorized effectively, making it easier to find important messages quickly. Additionally, features like Smart Mailboxes, rules, and email archiving help keep your inbox neat and structured. If you encounter any issues, troubleshooting methods can help resolve them efficiently. For expert email management solutions, trust the Emails Partner Team to provide reliable guidance and support.