In today's fast-paced digital world, the ability to schedule emails is a valuable tool for effective communication. Whether you're managing work emails, personal correspondence, or reminders, knowing how to schedule an email in Proton Mail can help you streamline your tasks and improve productivity. Proton Mail, known for its security and privacy, has introduced scheduling features that allow users to send emails at a specific time and date. This guide will walk you through the process and highlight the benefits of scheduling emails in Proton Mail.
Why Schedule Emails in Proton Mail?
Scheduling emails can be beneficial for several reasons:
- Time Management – Compose emails in advance and send them at the right moment.
- Better Email Engagement – Reach recipients when they are most likely to respond.
- Global Communication – Accommodate different time zones effectively.
- Professionalism – Maintain a structured communication plan for business needs.
- Avoid Forgetfulness – Schedule reminders, birthday greetings, or important follow-ups.
Step-by-Step Guide to Scheduling Emails in Proton Mail
Step 1: Log in to Your Proton Mail Account
Before you can schedule an email, you need to access your Proton Mail account:
- Visit Proton Mail
- Enter your login credentials and sign in.
Step 2: Compose a New Email
- Click on the Compose button to open a new email window.
- Enter the recipient’s email address, subject, and body of the message.
- Attach files or format the text as needed.
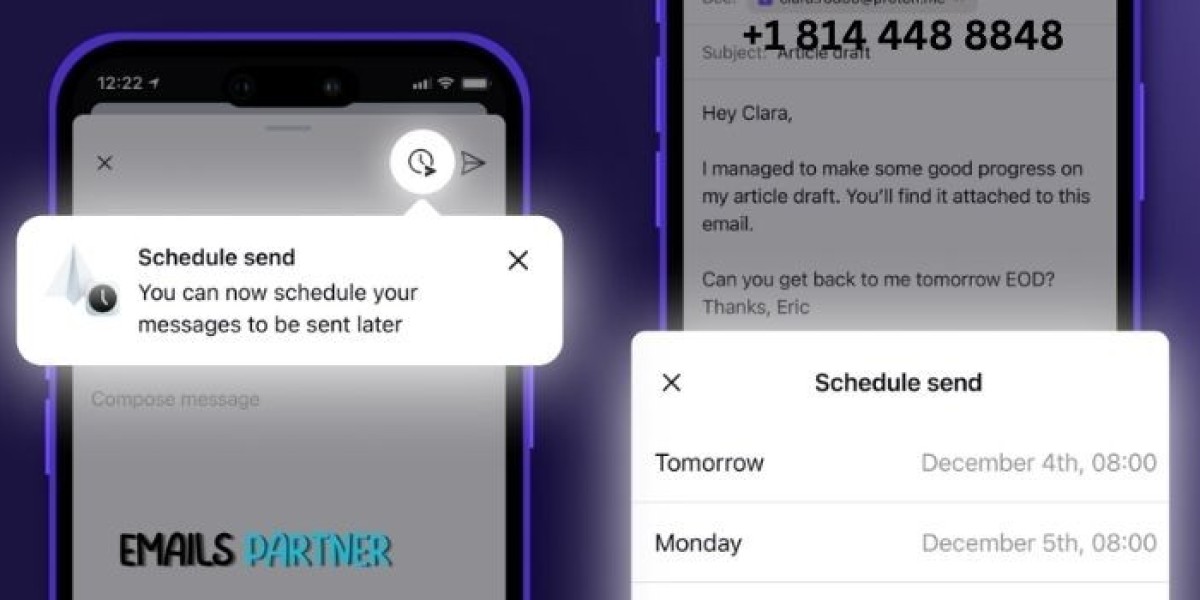
Step 3: Access the Scheduling Feature
- Look for the Send Later or Schedule Send option within the compose window.
- Click on this option to open the scheduling settings.
Step 4: Set the Date and Time
- Choose the desired date and time for your email to be sent.
- Ensure you select the correct time zone for accurate delivery.
- Confirm your selection before proceeding.
Step 5: Finalize and Schedule
- Review your email for accuracy.
- Click the Schedule button to queue the email for future delivery.
Managing Scheduled Emails
Editing a Scheduled Email
If you need to make changes before an email is sent:
- Navigate to the Scheduled Emails folder in Proton Mail.
- Select the email and click Edit to modify the content or reschedule.
Canceling a Scheduled Email
- Go to your Scheduled Emails folder.
- Click on the email and select Cancel Send to stop the scheduled delivery.
- The email will be moved back to your drafts.
Troubleshooting Email Scheduling Issues
Email Not Sending at the Scheduled Time
- Check if your device is connected to the internet.
- Verify that the time zone settings are correct.
- Ensure your Proton Mail subscription includes scheduling features.
Missing Scheduled Emails
- Refresh your Proton Mail inbox and check the Sent folder.
- Confirm that the email was scheduled correctly in the settings.
Advantages of Using Proton Mail for Scheduled Emails
1. Enhanced Security and Privacy
Proton Mail uses end-to-end encryption to protect your scheduled emails, ensuring they remain private until delivery.
2. User-Friendly Interface
The scheduling feature is integrated seamlessly into the compose window, making it easy to set up.
3. Compatibility Across Devices
You can schedule emails using Proton Mail’s web interface and mobile apps for convenience.
4. Improved Email Productivity
By scheduling emails in advance, users can manage their workflow efficiently without worrying about last-minute sends.
Best Practices for Scheduling Emails in Proton Mail
- Choose the Best Time – Schedule emails based on the recipient’s time zone and typical activity.
- Double-Check the Details – Ensure accuracy in content, attachments, and recipient addresses before scheduling.
- Use Scheduling Strategically – Plan emails for work, follow-ups, and marketing campaigns effectively.
- Monitor Scheduled Emails – Check the Scheduled Emails folder regularly for any necessary adjustments.
- Combine with Other Proton Mail Features – Use labels, encryption, and priority markers to enhance scheduled emails.
Conclusion
Scheduling emails in Proton Mail is a powerful feature that enhances productivity and ensures timely communication. Whether for business or personal use, scheduling allows users to plan and send messages at the most effective time. By following these steps and best practices, you can maximize the benefits of email scheduling within Proton Mail.
Understanding how to schedule an email in Proton Mail can help users manage their time, improve email engagement, and maintain professionalism. With easy scheduling options, Proton Mail provides a secure and reliable platform for timed communication. For additional support on email scheduling, the Emails Partner Team offers expert guidance on optimizing your email workflow.